


Stay service-savvy
Get all the latest news and insights straight to your inbox.

These have become the new norm for workers around the world , as a result of this collaboration continues to be conducted virtually.
Queue Microsoft Teams! Whether you’re hosting virtual meetings, carrying out daily group and 1:1 chat, sharing documents, or co-authoring in a document in real-time - Teams enables safe and secure collaboration!
Tip 1: Control who can join your meetings
If you're organising a meeting you can change participant settings for a meeting through the Meeting options web pages.
In Teams, select a meeting from your calendar and select Meeting options. From these options you can change setting such as who can bypass the lobby and who needs to be admitted to join.
From these options you can also decide which participants can join with a presenter role to present content and those who will join as standard attendees. Another useful tool for large meetings is the ability to prevent members from unmuting themselves.
Tip 2: Mute individuals or all attendees
Prevent intentional or accidental meeting interruptions by muting individual or all meeting attendees.
If an attendee happens to leave their microphone unmuted as a meeting organiser you can easily mute them from the participant pane. During large meetings with designated speakers, such as a lecture or town hall, the ability to mute all attendees ensures your presenter won't be interrupted.
Tip 3: Set who can share their screen or present content
Meeting organisers can set who has the ability to present content or screen share within the meeting. This is done prior to the meeting start via the meeting options.
Once your meeting has started, participants can be selected from the participant pane to determine whether they have the presenter role or are an attendee.
This is particularly useful if you have outside participants attending who only temporarily require the presenter role. This option also prevents people accidentally sharing content.
Tip 4: End your Teams meeting at once
As the meeting organiser you can end the meeting at your discretion without allowing participants to remain.
Once a meeting has wrapped up, instead of clicking Leave, select the dropdown located next to it and click End Meeting. You can also access this by going into your meeting controls, click more options (...) , and select End Meeting. This will end and close the meeting for everyone in attendance.
This is particularly useful where meetings are recorded to use later.
Tip 5: Create a team with increased security
If any of the content stored or discussed within the team may be considered business sensitive, such as financial details or classified project information, it’s best practice to apply increased protections to that team to ensure the content security. This can be accomplished by creating a new team and applying an IT-created sensitivity label. When applying a sensitivity label to your team, it automatically applies the configured protections to the team.
When creating a new team, on the sensitivity and privacy pane select the dropdown under Sensitivity to select an IT-created sensitivity label to apply to the team. As a reminder, it’s always best to check with your organisation or IT department on how sensitive business information should be stored.
Tip 6: Create a private channel
The sharing of sensitive information is one that organisations can struggle to control. Sometimes this information needs to be shared within a team to specific members only, such as project details or strategic planning.
Instead of creating a new team you can create a private channel within your existing team that is only accessible to members with designated access.
This adds an extra security layer to sharing sensitive information and is particularly useful if using teams outside of just your organisation.
To create a private channel, go to the team and choose more options (...) and select Add channel. After providing a name and description, under Privacy select the dropdown arrow to specify the channel is Private – Accessible only to a specific group of people within the team. Once created, you can add additional private channel owners and up to 250 members. As a reminder, it’s always best to check with your organization or IT department on how sensitive business information should be stored.
Tip 7: Help protect sensitive data in Teams
Microsoft Teams supports data protection policies to help protect sensitive information from being accidentally or inadvertently shared.
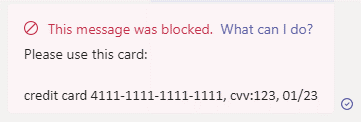
If you see this message when working in Teams 1:1 or in a channel chat, you may have a message returned as blocked if that message contains information meets your organisation's sensitive information policy.
If you do a receive this message you may also see a clickable link that says What can I do? When you click this a policy tip created by your organisation will be displayed, explaining what content was considered business sensitive. Policy tips are designed to help the sender understand why certain content is considered business sensitive or is best practice not to share.
We hope these tips will help you remain safe and secure whilst collaborating online and using Microsoft Teams.